I am so honored – one of my best friends, Jamie, asked me to make a set of 30 custom thank you cards for her sister’s bridal shower! So I made these cards to coordinate with Jen’s wedding colors of navy and gold. I chose to make the cards 4Bar size, which works well for a quick note of thanks.
I used Paper Source A7 flat cards in the color Night, since I knew I could get two 4Bar card fronts (cut down to 3 1/4″ x 4 5/8″) from each A7 flat card. I also used some gold foiled A2 folded card bases that I found at a local craft store, and just cut each of those down to 4Bar measurements of 3 1/2″ x 4 7/8″. I originally was going to only have the front of the card gold, but these card bases allowed for the gold to go around the back, as well as leaving the inside white for easy writing. The matching envelopes were also from Paper Source in the same dark blue Night color.
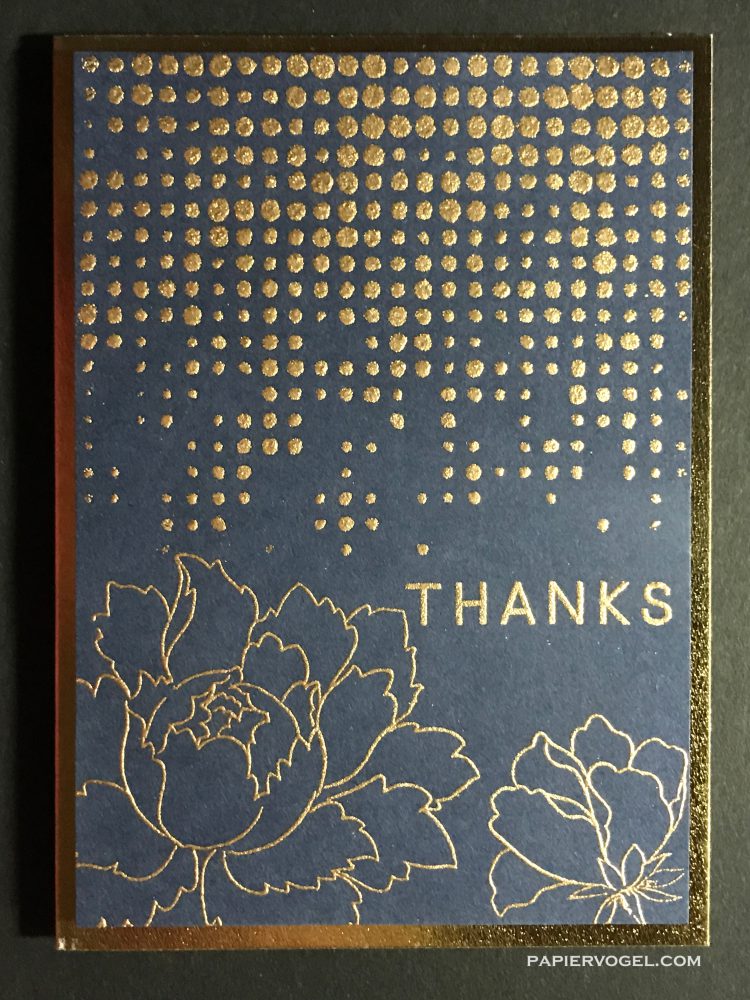
I just love the look of heat embossing – the texture and shine of the gold stands out so well against the dark blue paper! I used Ranger gold embossing powder for all the embossing. I started out with the Tim Holtz Dot Fade stencil, and positioned it at the top of the card front so that I could also stamp a sentiment and some flowers below. I liberally coated each card front with anti-static powder and used a mini ink blending tool to apply Versamark ink through the stencil. After the embossing powder was applied, I used a dry paintbrush to carefully remove any stray embossing powder. However, I found that if I treated the cardstock with the anti-static powder, I didn’t have much to remove. I applied the embossing powder to four cards at a time before using my heat tool to melt the powder in small, manageable batches.

Once all the card fronts were embossed with the fading dots design, I pulled out my MISTI to stamp the other images onto the bottom half. I chose to use only the outline stamps from Altenew’s Peony Bouquet, and went with the large open peony and the smaller peony images. I left a little space above the smaller peony for the “thanks” stamp from Concord & 9th’s Hello Lovely. I managed to arrange all three of these stamps on the MISTI so that I could stamp them all at the same time. Once again, I treated the cardstock with anti-static powder before stamping the flowers and sentiment with Versamark ink, coated them with the same gold embossing powder, and then worked in small batches of four cards at a time.

Once all the embossing powder was melted and cooled down, I took a dry cloth and gently wiped each card front to remove the anti-static powder. I then took some 2mm thick craft foam sheets cut down to 3″ x 4 3/8″, and adhered them to the back of the embossed card fronts to pop them up on the card bases. (Each foam sheet was 12″ x 18″, which allowed me to get 16 rectangles from each sheet.) I used my ATG on one side of the foam to adhere them to the card fronts, and then on the other side of the foam to adhere the card fronts to the card bases. Each rectangle of foam not only provided a solid surface of dimension, but also helped flatten out the card fronts that had warped slightly from all the heat embossing.
At my friend’s request, I also used my custom stamp on the back of each card so that her sister and the recipients would know that the cards were handmade. Since the card bases are gold foil and a slick surface, I had to use Staz-On ink. The foiled surface was a little uneven, so the solid image of my stamp did not stamp completely, but all of the lettering did, so I didn’t worry too much about it.
For the envelopes, I wanted to add some gold detail to the bottom left corner, but wanted something other than embossing since there was already so much on the cards. I decided to use Perfect Pearls in gold, along with the Perfect Medium stamp pad included in the kit. I used my MISTI and one of the MISTI creative corners to stamp the large peony outline hanging off the left bottom edge of each envelope. I applied the Perfect Pearls to each peony with a small tipped brush, and then brushed away the excess with a larger, softer brush. I also used a dry paper towel to lightly brush away any stray shimmer, as I wanted the flower to really stand out alone. After removing all the excess powder, I spritzed some water in the air with my Distress sprayer and waved each envelope through the mist to set the Perfect Pearls.
To make it easy on the bride-to-be (cuz we all know how overwhelming it can be to plan a wedding), I decided to pre-print address labels for her, as well as provide the postage for each card. Since these cards are not simple flat cards, an extra ounce of postage was required. Rather than using two separate stamps, the nice lady at my post office helped me find some pretty 70-cent stamps, as there’s not a lot of real estate on a 4Bar envelope!

I also found a small box at my local craft store for packaging up everything. It had blue hydrangeas on it and happened to perfectly fit the cards & envelopes. (Please excuse the mess around the box – I literally had to push stuff to the side to clear a space for it!)


There was even a little room on top for the stamps and labels, packaged in a glassine envelope.

So here’s the final card with a matching envelope, because…the secret is you got to coordinate!! (Anyone else remember that part from the movie Boomerang?!) Anyway, I hope that Jen loves these cards as much as I loved making them!
